Setting up a dual battery system in your 4WD, caravan or camper trailer doesn't just end with purchasing a charger and batteries. Your system needs to be wired in the safest way that will provide the greatest performance and longevity.
As with any electrical installation, you should always consult the owner's manual for correct installation. Enerdrive provides detailed DC to DC charger wiring diagrams that make life easy for both professionals and DIY installers.
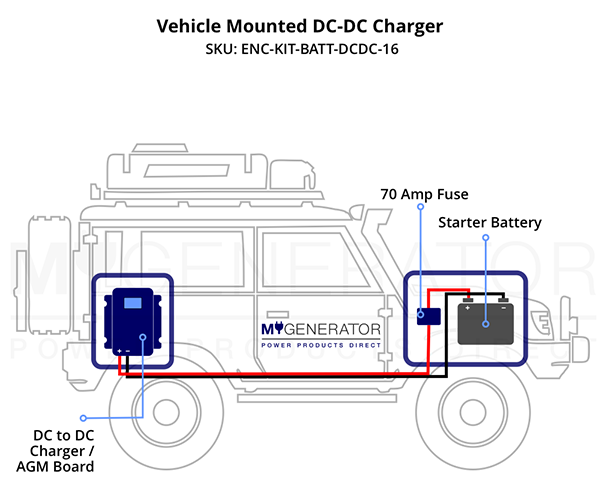
The following image is the DC to DC charger wiring diagram for an in-vehicle installation of the Enerdrive 40A DC to DC Battery Charger.
-

-
The essential wiring outline of this product is as follows:
-
Starter battery to charger with fuse/breaker mounted as close to starter battery as possible
-
Charger to house battery with inline fuse/breaker
-
Solar panel to charger with optional solar isolator
This wiring diagram often raises several questions for example:
-
What size cable do I need?
-
What size fuse/breaker do I need?
-
What length of cable do I need?
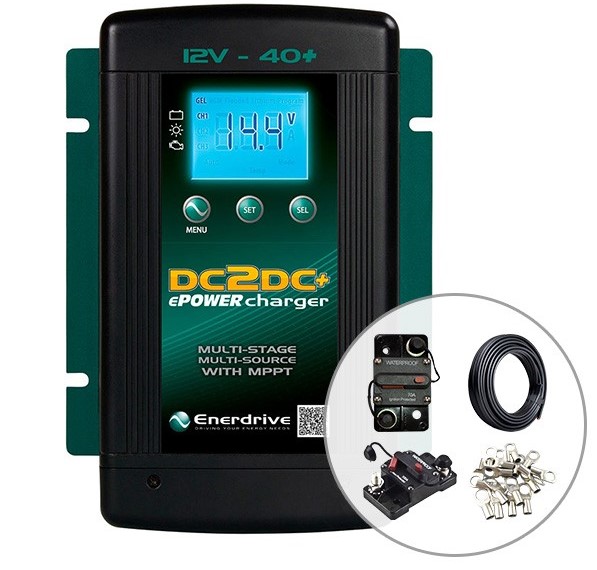
To make it simple, we have created two DIY DC to DC Charger Installation Kits that can be used in conjunction with the DC to DC charger wiring diagrams. Within these kits, you will find the right diameter of cable, the right size fuses/breakers, and the right size lugs for connecting the charger to the vehicle and house battery. You will require a pair of Ratchet Crimping Pliers to crimp the lugs to the cable for a secure connection.
-
Enerdrive 40A DC to DC Battery Charger with Installation Kit
The kit includes:
-
Enerdrive DC2DC Battery Charger - 12V 40A, EN3DC40
-
16mm ² Twin Core Cable 6 Meters
-
16MM - 8mm Diameter Cable Lugs x12 Pieces
-
70 Amp Manual Reset Circuit Breaker x1 Piece
-
60 Amp Manual Reset Circuit Breaker x1 Piece
Enerdrive 40A DC to DC Battery Charger with Midi Fuse Installation Kit
The kit includes:
-
Enerdrive DC2DC Battery Charger - 12V 40A, EN3DC40
-
16mm ² Twin Core Cable 6 Meters
-
16MM - 8mm Diameter Cable Lugs x12 Pieces
-
2 x Enerdrive Modular Fuse Holder (Fuse Module)
-
Fuses (60A and 70A)
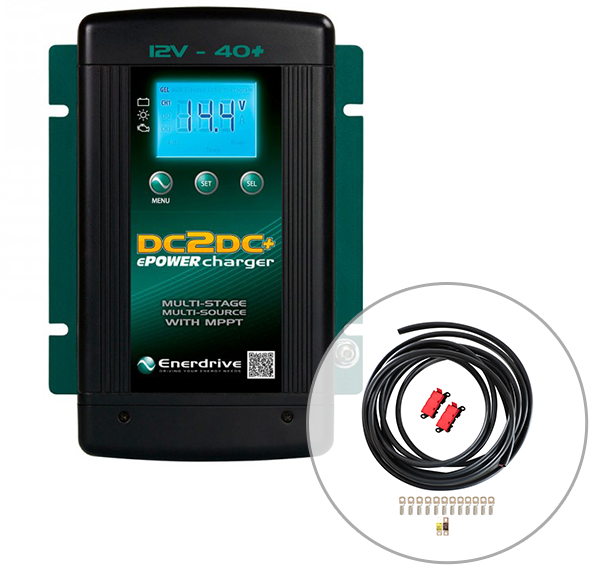
There is a personal preference whether you choose the kit with the midi fuses or the resettable circuit breakers.
The advantage of the resettable circuit breakers is that you do not have to carry spare blade fuses. The advantage of the midi fuse holders is that they take up less space than the circuit breakers, which are slightly larger. The midi fuse installation kit is also a lot cheaper.
Be rest assured, no matter which kit you choose, we supply the best quality 16m2 cable and components with these kits! These kits are targeted towards the in-vehicle installation and there should be enough cable to run from the starter battery to the charger and then enough to run from the charger to the house battery.
-
Canopy Systems & DIY Installation Kits (E-SYSTEM):
We have seen a rise in demand for pre-wired DC to DC charger charging boards & power systems.
Enerdrive's most popular pre-installed power systems are the super tough canopy systems:
-
Enerdrive have released three pre-wired charging cables to connect to the DC to DC charger that is mounted in these systems.
We've created three simple DC to DC charger wiring diagrams to make your buying decision seamless!
Step One: Decide where you are planning on mounting the DC to DC Charger. Either in your drive vehicle or in the caravan or trailer.
Step Two: Choose the appropriate cable/cables below:
-
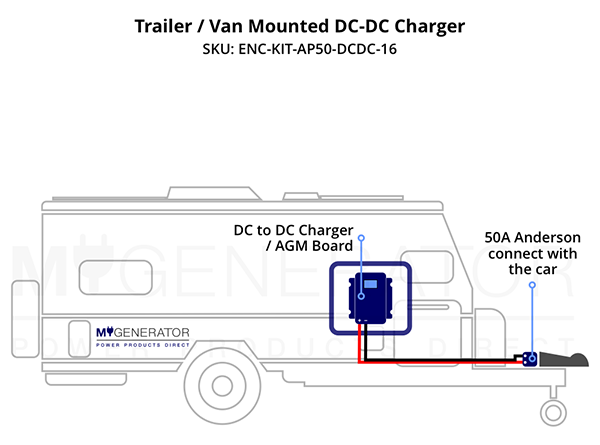
Mounted In Drive Vehicle:
Cable #1 (Part ENC-KIT-BATT-DCDC-16) is for connecting your starter battery to the Charger when the charger is mounted in the back of the vehicle.
-
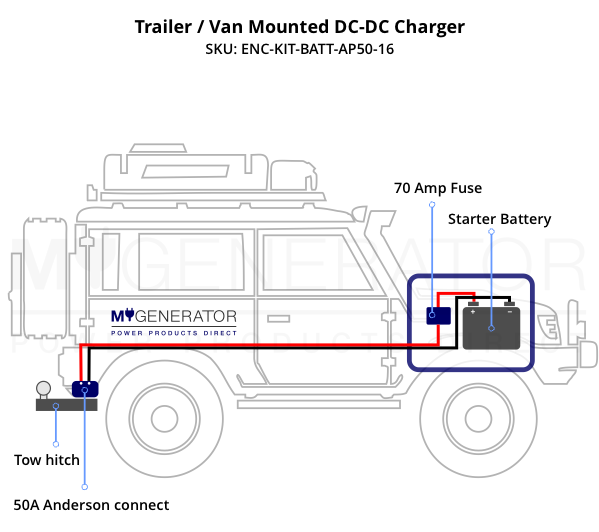
Mounted In Caravan/Trailer:
You will need to purchase Cable 2 and 3 for connecting your starter battery to the charger when the charger is mounted in the Caravan or Trailer.
Cable #2 (Part ENC-KIT-BATT-AP50-16) is for running from starter battery to Tow Hitch.
-
Cable #3 (Part ENC-KIT-AP50-DCDC-16) is for running from the Tow Hitch to the DC to DC Charger.
-
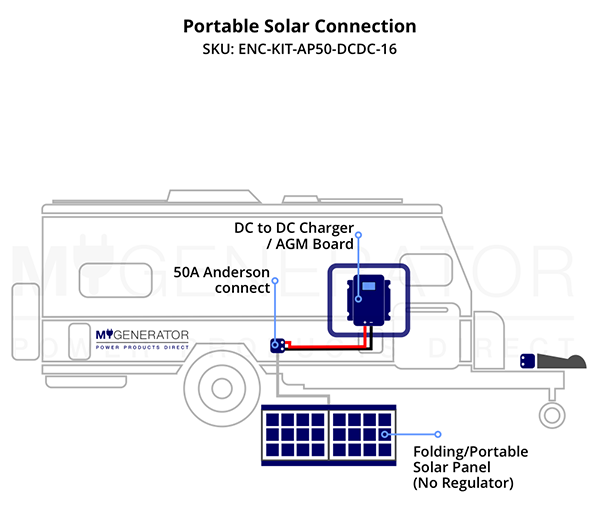
I Have A Portable Solar Panel:
You may also choose to purchase a second Cable #3 (Part ENC-KIT-AP50-DCDC-16) for connecting a portable solar panel (unregulated) via an Anderson Plug.
The cable size supplied in the above kits is always 16mm2. This cable is thick enough to carry the full current to your charger and across the cable lengths supplied. Correct cable size and cable quality are the most common downfall of these types of systems.
-
How Do I Connect My Battery To My Canopy System?
The Enerdrive Canopy Power Systems now come with battery cables pre-wired.
Power System Included Battery Cable Specifications:
-
Explorer and Traveller System - 1m positive and negative cable (35mm2) with 100A in line fuse and fuse holder. Terminated with 8mm lugs for battery connection.
-
Adventurer System - 1m positive and negative cable (70mm2) with 250A in line fuse and fuse holder. Terminated with 8mm lugs for battery connection.
-
Wanderer System - 1.5m positive and negative cable (50mm2) with in 250A line fuse and fuse holder. Terminated with 8mm lugs for battery connection.
-
Lackey System - slightly different battery wiring connection: 175A Andersen Plug pre-fitted for battery input.
-
Voyager System - is not supplied with battery cabling as it is often paried with the Enerdrive B-TEC Slim range which has varrying terminal positions.
-
How Do I Connect My Battery To My E-SYSTEM Board:
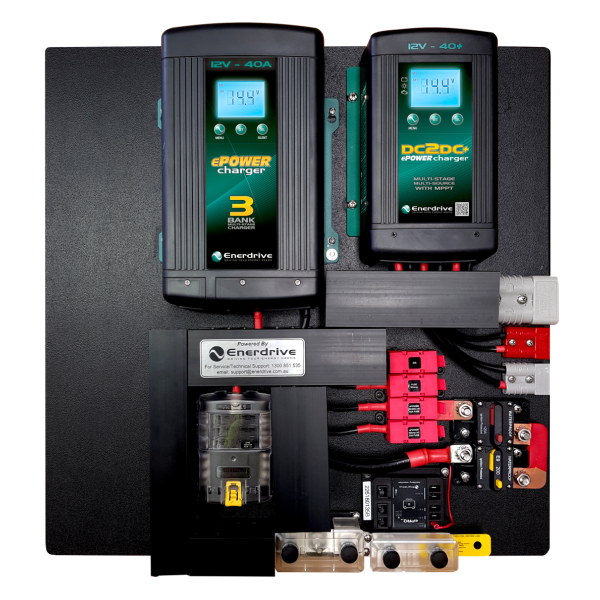
The Enerdrive DIY 40A AC and 40A DC2DC Charging Board below is one of the many Enerdrive E-SYSTEM boards.
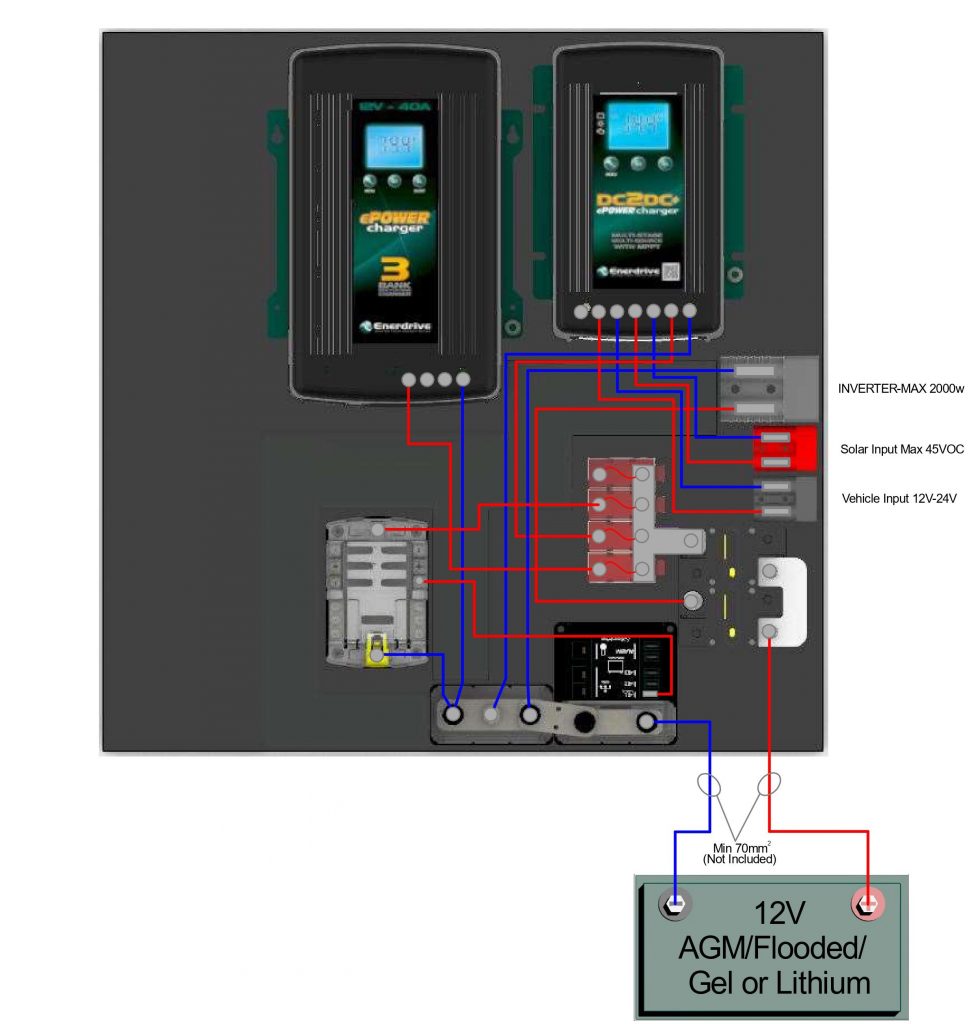
Below is the wiring diagram for the Enerdrive DIY 40A AC and 40A DC2DC Charging Board. As you can see the battery cable is not supplied and needs to be purchased from the list of accessories.
-
When installing any of the Enerdrive E-SYSTEM boards then you will need to purchase the correct battery cable. These cables go from the board to the house battery.
They are available in lengths of 1000mm or 1500mm and 70mm2 or 95mm2 gauge.
In most cases, you would choose one set of cables at 70mm2. ENC-KIT-70-1000MM or ENC-KIT-70-1500MM. These are pre-terminated with 8mm lugs for connection between the board and the Enerdrive Lithium Batteries.
If you have or are purchasing an inverter with your E-SYSTEM boards, you will need to purchase 2 of these cables (one for battery to board and another one for board to inverter).
70mm2 for up to 2000W inverter and 95mm2 for 2000W - 3000W inverter.
Choose 1m (1000mm) or 1.5m (1500mm) depending on how far away you mount the inverter from the board.
Tech Tip: mount the inverter as close to the board as possible!
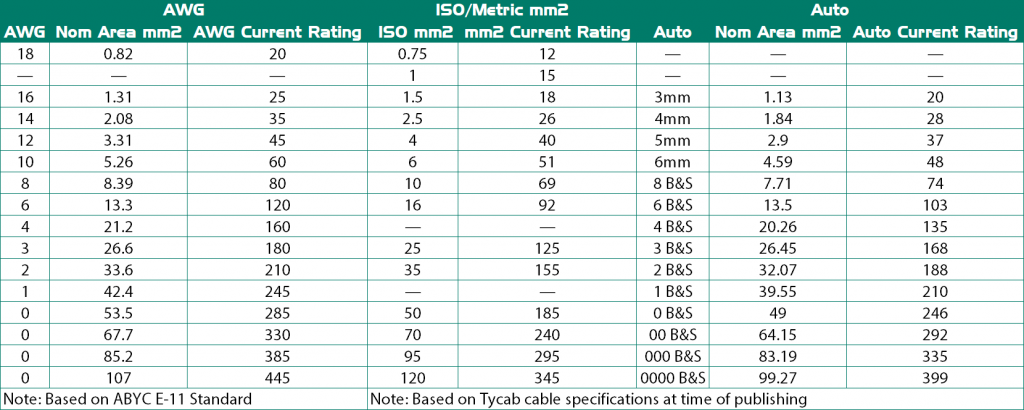
As there are so many units of measure, Enerdrive have provided a cable conversion chart below. Enerdrive cable is rated in ISO mm2 but many people use the Auto (B&S) cable sizing. 16mm2 = 6 B&S.
Please note, Enerdrive and My Generator has provided these DC to DC charger wiring diagrams as a guide only and installers must ensure the system is installed to the local requirements for fuse protection and wire sizing (see manual). If you have any questions please call; Enerdrive on 07 3390 6900.
DISCLAIMER* Please note, this advice is general in nature and we strongly recommend consulting the product manual and where relevant, a professional installer.